I get calls every week from homeowners who've had bad contractor experiences — no-shows, surprise add-ons, finished floors that peel in a year. They're cautious, and they should be. This industry has a trust problem.
So when I talk to someone about their garage floor, I'm not just selling a job. I'm trying to prove something: that this can be different. Transparent pricing, clear communication, a finished floor that's worth what you paid. Here's exactly what that looks like.
The Quote Call — What I Actually Ask
The first conversation is a fact-finding mission, not a sales pitch. I ask questions most contractors skip because they don't want to hear answers that might kill the deal.
Garage use: Is this a daily-driver garage, a shop, a gym space, or mostly storage? A 1,000 sqft shop floor gets a different system than a clean 2-car garage that mostly holds two sedans.
Concrete condition: I ask about cracks, prior coatings, oil stains, and whether they've had moisture issues. A floor with moisture vapor transmission needs different prep than one with a solid, clean slab. If you don't know — fine, I'll look at it myself.
What you've seen that you like: If they've got a reference photo — from a friend's floor, a website, a showroom — I want to see it. It tells me what they're actually after, not just what they think they can ask for.
Timeline: Some people want it done next week; others have six months. I'm realistic about my schedule, and I don't oversell urgency.
I don't pressure you into deciding on the phone. I don't quote a price without seeing the floor. And I don't promise a timeline I can't keep. If you want to think about it — think about it. If you get other quotes, get them. A good decision needs comparison.
The Site Visit — Why It Matters
For most jobs I come look at the floor in person. Not to close a deal — you already have my number — but because pricing a floor I've only seen in a phone photo is guessing. I need to see the concrete, check for moisture, measure the actual square footage, and identify anything that needs repair before install day.
During the visit I'll walk through the entire scope with you: what I'm fixing, what system I'm recommending, what it will look like, and what it's going to cost. No hidden line items. No "we found something once we got started." If there's a crack that needs filling, you know about it before I start. If the floor needs an extra day of prep, I tell you before I schedule.
If the floor isn't ready for install — moisture issues, major cracks, incompatible prior coating — I'll tell you that too. I'd rather lose the job than lay epoxy over a floor that's going to fail in eighteen months and give you a call saying the same thing happened again.
The 5-Step Process — From Contract to Completed Floor
Prep Day — Mechanical Grinding
The concrete gets ground with industrial diamond tooling to open the surface and create a proper profile for adhesion. We don't chemical-etch — it's inconsistent in Florida's humidity and leaves a soft, weak surface layer. Mechanical prep is more work, but it's the right way to do it. This day is loud and dusty; we seal off the garage and protect anything that's staying.
Repairs and Cracks
After grinding, we fill cracks, patch spalls, and address any surface defects with a structural concrete repair compound. This step is invisible in the finished floor — but it's the difference between a floor that looks great for ten years and one that shows cracks again six months after install.
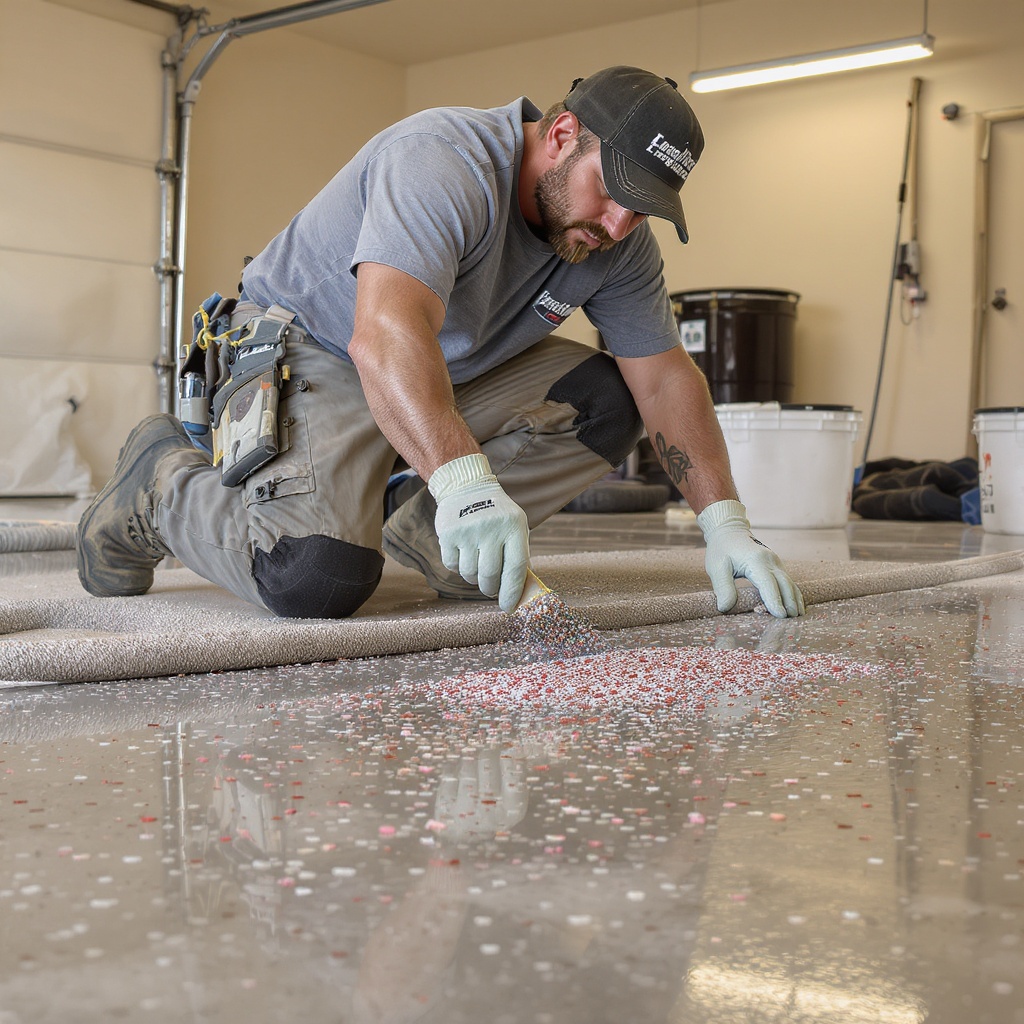
Base Coat and Decorative Layer
Once prep is done and the surface is clean, we apply the base coat — 100% solids epoxy mixed to the spec for your floor and your conditions. For flake systems, we broadcast the flakes into the wet base coat. For metallic systems, we pour and manipulate the metallic pigments. Each approach requires a different technique, different timing, and different attention to detail. This is where the experience of the installer shows.
Cure and Recoat
After the base coat cures — typically 12–24 hours depending on temperature and humidity — we inspect it, scrape any high spots, and apply the topcoat. For any floor in Central Florida, that topcoat is polyaspartic. Always. Standard epoxy topcoat yellows and degrades in Florida UV within 2–3 years. Polyaspartic holds up 3–5x longer and maintains its clarity and gloss.
Final Walkthrough and Care Instructions
When the topcoat has cured, I do a final inspection with you. We check for any missed spots, verify the finish is uniform, and walk through the care instructions. I answer any questions you have. The floor can't be driven on for 24–48 hours after topcoat — I'll tell you exactly when it's safe. I give you my number. If something comes up in a week, a month, or two years, you can reach me directly.
What We Select — And Why It Depends
Not every floor gets the same system. A 3-year-old slab in a climate-controlled garage in Winter Garden is a different starting point than a 20-year-old slab in an unconditioned Kissimmee garage. I select the materials based on:
- Concrete age and condition — older concrete with more porosity needs a different base coat spec
- Moisture levels — we test for vapor transmission; high-moisture floors need a moisture-mitigating primer
- UV exposure — a garage door that stays open all day or no climate control means a different topcoat choice
- Use case — a show-car garage gets a different finish than a mechanic's bay, even if it's the same square footage
This is why an online quote is only a starting point. The floor tells us what it needs once we've seen it.
What Customers Tell Me After
After the job, a lot of customers say the same few things: "I didn't realize how thorough the prep was." "The floor looks better in person than in the photos." "I didn't expect you to still answer questions three months later."
That last one shouldn't be notable — but it apparently is. I answer when people call. If there's an issue, I come look at it. If it was something we did wrong, we fix it. If it's something that happened after (dropped chemicals, dragging heavy equipment, new moisture issues), I'll tell you what's going on and what it takes to address it. You won't get a voicemail and a prayer.
Ready to talk about your garage floor? Tell me what you've got and what you're working with.
Get Free Estimate → Real numbers, real timeline, no pressure.